Ultimate Guide on How to Treat Blisters When You’re Hiking
There’s one pesky but common hiking companion that everyone has to deal with at some point: blisters. We’ve all been there, hitting the trails with excitement, only to have those tiny, painful bubbles show up uninvited on our feet. But fear not! There are easy ways to treat blisters when you’re hiking.
How to Treat Foot Blisters on a Hike
This post may contain affiliate links for which I may be compensated. As an Amazon Associate I earn from qualifying purchases.
In this guide, you’ll discover some tried-and-true tips on how to treat blisters when hiking, so you can get back to enjoying those breathtaking views and epic adventures without the discomfort slowing you down. So grab your favorite pair of hiking boots and let’s dive in!
What Causes Blisters?

Blisters are like that annoying cousin who shows up uninvited to family gatherings, but in this case, they arrive on our feet, causing discomfort and sometimes even pain. So, what exactly causes these unwelcome guests?
Pressure and moisture are the primary culprits behind blisters.
Picture this: you’re out on the trail, striding confidently with each step. However, your socks and hiking boots might not be getting along as well as you are with nature.
As you walk, your foot rubs against the sock and boot’s inner surface, creating friction. This constant rubbing creates pressure on certain areas of your foot, typically the heels and toes, and that’s where the blister starts to form.
But wait, there’s more! Moisture also plays a significant role in blister development. When you get sweaty feet, whether due to hot weather, intense physical activity, or poorly breathable footwear, the moisture softens your skin, making it more susceptible to friction-induced damage. Wet skin is like a red carpet invitation for blisters.
Additionally, ill-fitting hiking boots can exacerbate the problem. If your boots are too tight or too loose, your feet are more likely to move around inside, increasing the friction and pressure on specific areas. This is why getting the right pair of hiking boots that fit well is crucial for preventing blister woes.
Now that we know the culprits behind blisters, it’s time to delve into some blister-busting solutions so you can keep hiking like a champ!
How to Prevent Blisters
The best way to treat blisters is to make sure they don’t form in the first place. You can use these tips to help prevent a painful blister from forming on your hike so you never experience any pain.
1. Make Sure Your Boots Fit Properly
The first thing you can do to help prevent blisters is to ensure you’re wearing hiking boots that fit properly. Footwear that’s too tight will create pressure that will lead to blisters, so you need some space in your shoes.
Also, keep in mind that when you’re hiking, especially if you’re going on a long hike, your feet may swell, flatten, or widen. You’ll need to have some extra space in your shoes to accommodate these changes.
However, while a little extra roominess is good, you don’t want to have so much extra space that your feet are sliding around in your shoe. This movement can also cause a blister to form.
If you feel like your feet are between sizes, a good pair of supportive insoles can help make up the difference. As an added bonus, they can also provide some extra cushioning and support to help prevent achy feet!
2. Break in Your Hiking Boots
Once you have the right hiking boots, you need to break them in before you start hiking in them. New boots are often very stiff, and those hard places will create areas of pressure or friction that can cause a blister.
It’s much easier to discover spots that might cause discomfort when you’re at home instead of out on the trail. Plus, when you break in your shoes, they’ll conform to your feet, become more comfortable, and be less likely to cause blisters.
For more help, be sure to check out this guide on how to properly break in hiking boots for tips and tricks on how to get those boots ready for your next hike.
3. Wear Proper Socks

A lot of people invest a lot of time and money into good hiking boots, and then completely ignore the type of hiking socks they wear with their boots. But this is a big mistake when it comes to preventing blisters!
A nice pair of quality hiking socks are crucial for keeping your feet dry and comfortable when you’re hiking. When you’re choosing hiking socks, it’s always important to avoid cotton.
Cotton socks will retain moisture. As we’ve already discussed, wet feet are more susceptible to blisters.
Instead, choose merino wool or synthetic socks. Also, just like hiking boots, make sure your socks fit properly.
Socks that are too big will create wrinkles that can cause friction. Socks that are too small can slip or create pressure points.
Fortunately, no matter what type of weather you’re hiking in, you can find good hiking socks when you take a look at these helpful guides:
- Keep Your Feet Cool With These Top Hiking Socks for Summer
- Enjoy Warm and Cozy Feet With These Best Winter Hiking Socks
- The Best Toe Socks for Hikers to Help Prevent Blisters
4. Wear Liner Socks

If you’re having problems getting a comfortable, snug fit with your hiking socks, consider wearing a pair of liner socks in addition to your regular hiking socks.
Not only will thin liner socks add a protective layer between your skin and your hiking socks, but they can also help wick away moisture.
5. Bring Extra Socks
When you’re getting that backpack loaded up with all of your essential hiking gear, don’t forget to throw in a few extra pairs of socks! Your feet are likely going to sweat on your hike, and even the best pair of moisture-wicking socks will eventually become wet.
As we know, wet socks are a blister just waiting to happen.
Related: How to Stay Dry When You’re Hiking in the Rain
If you’re going on a multi-day hike, you can wash your socks and hang them out to air-dry overnight. Then simply use your extra socks the next day. Of course, even if you’re just going on short hikes, it will feel great to change into nice, dry socks when needed.
Also, keep in mind that an extra pair of socks will come in handy if your feet get wet during a stream crossing!
6. Keep Your Feet Clean

Keeping your feet as clean as possible will help reduce blisters caused by dirt and debris rubbing against your skin. This can also help reduce the chances of an infection in any blisters that might accidentally form.
Related: How to Calculate How Much Water You Need for a Hike
Whether you’re hiking long distances or short day hikes, consider taking an occasional break to rinse off your feet in water. On a long hiking trip, take some time to clean your feet when you get to camp at the end of the day.
7. Give Your Feet Some Air Time
If you’re stopping for a bite to eat on the trail, use that opportunity to take off your hiking shoes and socks and give your feet some time to air-dry. Even though it might take a few extra minutes to get laced back up when you’re ready to get going again, giving your socks and skin a chance to dry out is well worth it.
Related: The Seven Principles of Leave No Trace Every Hiker Needs to Know
If you’re worried your feet might swell during your break, prop them up on your backpack. This is also a great opportunity to clean out any debris that might have gotten inside your shoes and check your feet for hot spots.
How to Treat Hot Spots
A hot spot is a place on your skin where friction is starting to cause a blister. As you’re hiking, make sure you’re paying close attention to how your feet feel. The minute you start to feel an uncomfortable spot, stop hiking and use these tips to treat the hot spot.
1. Stop Hiking
If you start to feel any pain or discomfort on your feet, you need to immediately stop hiking. Find a place where you can sit down and take off your shoes. Even though it’s annoying to have to stop, early detection will save you from having to deal with a full-on blister in the long-run.
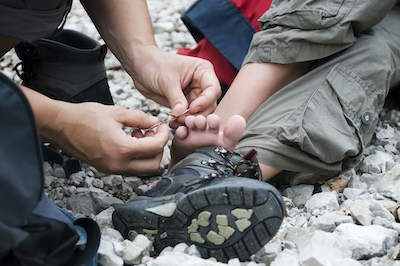
2. Cover the Spot
If a blister hasn’t started to form yet, clean your skin, dry the area, and then cover the hot spot with tape or a bandage. Some hikers will use duct tape, but I prefer to use either kinesiology tape, which is sometimes also called KT tape or athletic tape, or these blister bandages.
Other options you can use include medical tape or moleskin tape. Since most of these are cut-to-size options, don’t forget to keep a small pair of scissors in your hiking backpack.
No matter what you use, make sure it’s affixed as smoothly and cleanly as possible to your skin to prevent further friction. For proper coverage, position the tape over the hot spot so that it extends beyond the irritated area by an inch or more.
3. Apply Ointment
If your skin is raw or a blister has already started to form, apply some antibiotic ointment to the affected area before covering it with tape or a bandage.
4. Don’t Remove the Cover
If the hot spot doesn’t get any worse during your hike, try to leave the tape in place until you get home. Only remove the tape if you’re cleaning the area, and then immediately put new tape back on to ensure the hot spot doesn’t get worse.
How to Treat Blisters
Treating a hot spot soon enough should be all you have to do to prevent blisters from forming. However, if you don’t catch it in time, you can follow these steps to treat blisters when hiking:
- Using scissors, cut molefoam padding into the shape of a doughnut. Make sure the inner hole is the same size or slightly larger than the blister.
- Clean the irritated skin with an alcohol wipe and let the area dry.
- Apply the molefoam doughnut over the blister, then cover the entire area with athletic tape to keep it clean.
Try to keep this area protected for a few days. This will allow the healing process to start and lower the risk of infection.
However, it is a good idea to let the blister air out while you’re sleeping. Simply repeat the protective process every morning until the wound has healed.
What to Keep in Your Blister First Aid Kit
In addition to your regular first aid kit, consider putting together a small blister kit that has the necessary supplies you need for proper blister care. Here are some supplies you can keep in your blister first aid kit so you’re always prepared to treat blisters on a hike:
- Athletic tape or moleskin tape
- Molefoam padding
- Blister bandages
- A small multi-tool with scissors and a knife
- Alcohol wipes
- A small tube of antibiotic ointment
- A safety pin or sewing needle
Related: Essential Survival Items Every Hiker Should Carry With Them
Should You Pop Blisters?
To pop or not to pop? It’s the age-old question every hiker faces when they develop a blister. I’m not in the medical profession but here’s what I’ve learned and has worked for me.
In most cases, you should refrain from popping a blister. A popped blister can create an opening for infection since you’re removing the protection and healing that the serum provides.
If the blister hasn’t popped, the skin will usually stay intact until a new layer has formed, and the body can reabsorb the fluid. This reduces the likelihood of an infection.
However, if you have a large blister that’s particularly painful, you can follow these steps to pop it:
- Clean the blister and the surrounding area with an alcohol wipe.
- Sterilize the needle with an alcohol wipe.
- Insert the needle at the bottom of the blister so the liquid can drain while you’re standing.
- Apply antibiotic ointment to the blister.
- Cut and place a molefoam padding doughnut around the area to prevent further irritation. For extra protection, fill the hole with antibiotic ointment, then cover the area with a layer of tape.
If your blister pops on its own, follow steps 4 and 5 to ensure the area stays clean and protected.
Although it’s rare for a popped blister to become infected, it’s always important to keep an eye on it. The following are signs of infection: pain, redness, or warmth near the blister area; pus or other fluids draining from the blister; fever or chills; red streaks around the blister; or swollen lymph nodes.
If you suspect you might have an infection, seek medical advice immediately.
How to Treat Blisters on a Hike
Blisters might be persistent little buggers, but armed with the right knowledge and a few tricks up your sleeve, you can conquer them like a hiking pro. Remember to pack some moleskin or blister pads in your first aid kit, choose socks that wick moisture away, and keep your feet dry whenever possible.
If you do end up with a blister, don’t fret — give it the care it deserves, protect it from further aggravation, and let it heal naturally. Your feet are your trusty hiking companions, so treat them well, and they’ll carry you through many more thrilling adventures!
More Outstanding Hiking Tips
Did you enjoy learning about how to treat blisters on a hike? Are you interested in additional helpful hiking tips you can use to get out on the trail? Then please be sure to take a look at some of our other popular posts:
- Must-See Hikes for Everyone in Great Smoky Mountains National Park
- Extremely Useful Tips on How to Go to the Bathroom in the Woods
- The Basic Rules of Hiking All Beginners Should Know
- The Best Trekking Poles for Every Type of Hiker